MongoDB OPS Manager的搭建及使用

MongoDB OPS Manager 是用于管理MongoDB集群和部署的工具。 通过MMS可以大大简化MongDB的管理部署。

1. 机器

三台机器 (注意修改hosts)

  • master
  • node1
  • node2

2. 安装前准备[ALL]

NUMA Settings

1
sysctl -w vm.zone_reclaim_mode=0

NTP Settings

1
2
sudo apt install -y ntp
service ntp start

ulimt settings

1
2
> ulimit  -a
> sudo vi /etc/security/limits.conf

追加

1
2
mongod soft nproc 65535
mongod hard nproc 65535

Disable Transparent Huge Pages

1
vim /etc/init.d/disable-transparent-hugepages

添加如下脚本

1
2
3
4
5
6
7
8
9
10
11
12
13
14
15
16
17
18
19
20
21
22
23
24
25
26
27
#!/bin/bash
### BEGIN INIT INFO
# Provides: disable-transparent-hugepages
# Required-Start: $local_fs
# Required-Stop:
# X-Start-Before: mongod mongodb-mms-automation-agent
# Default-Start: 2 3 4 5
# Default-Stop: 0 1 6
# Short-Description: Disable Linux transparent huge pages
# Description: Disable Linux transparent huge pages, to improve
# database performance.
### END INIT INFO
case $1 in
start)
if [ -d /sys/kernel/mm/transparent_hugepage ]; then
thp_path=/sys/kernel/mm/transparent_hugepage
elif [ -d /sys/kernel/mm/redhat_transparent_hugepage ]; then
thp_path=/sys/kernel/mm/redhat_transparent_hugepage
else
return 0
fi
echo 'never' > ${thp_path}/enabled
echo 'never' > ${thp_path}/defrag

unset thp_path
;;
esac

验证(重启生效)

1
2
cat /sys/kernel/mm/transparent_hugepage/enabled
cat /sys/kernel/mm/transparent_hugepage/defrag

有以下输出表示正确

1
always madvise [never]

3. 安装MongoDB(每台机器上)

我的笔记-NoSQL-MongoDB单机部署

使用TUNA源安装MongoDB

配置ReplicatSet副本

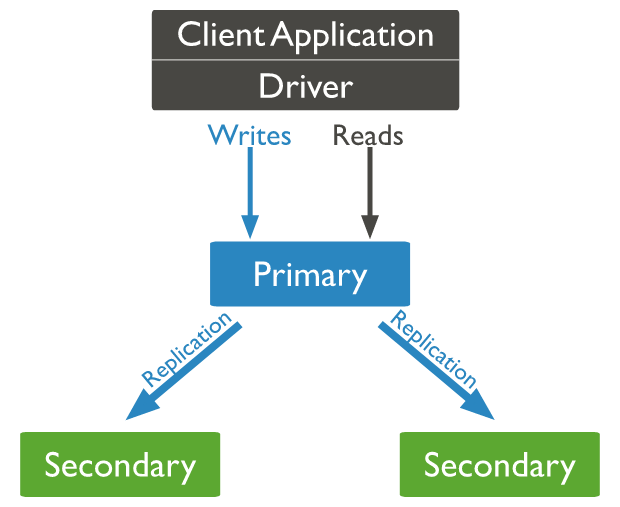
ReplicatSet结构如下
Alt text

Primary Node将自己的数据同步到Secondary Node
Alt text

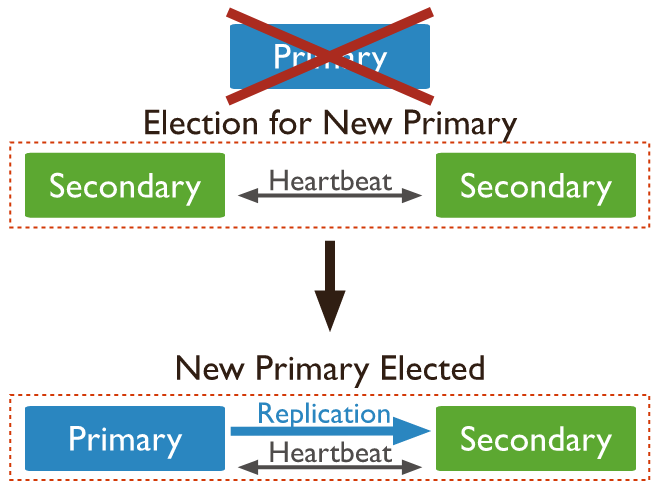
一旦primary Node挂了,或者10s内无法取得Heartbeat,Secondary Node会选举新的Primary Node
Alt text

[ALL]修改配置文件(最好自建)

1
2
# 默认mongodb.conf在 /etc/mongodb.conf
vim /home/cisdi/DBTEST/mongodb/mongod.conf
1
2
3
4
5
6
7
8
9
10
11
12
13
14
15
16
17
18
19
20
21
22
23
24
25
26
27
28
29
30
31
32
33
34
35
# for documentation of all options, see:
# http://docs.mongodb.org/manual/reference/configuration-options/

# Where and how to store data.
storage:
dbPath: /home/cisdi/DBTEST/mongodb/data
journal:
enabled: true
# engine:
# mmapv1:
# wiredTiger:

# where to write logging data.
systemLog:
destination: file
logAppend: true
path: /home/cisdi/DBTEST/mongodb/log/mongodb.log

# network interfaces
net:
port: 27018
# bindIp: 127.0.0.1

processManagement:
fork: true
#security:
#operationProfiling:

# 副本
replication:
replSetName: ops_manager
#sharding:
## Enterprise-Only Options:
#auditLog:
#snmp:

[ALL]启动MongoDB

1
mongod -f /home/cisdi/DBTEST/mongodb/mongod.conf

配置方式

任意一台机器上登录mongo

1
2
# 我们选master
mongo --port 27018
1
2
3
4
5
6
7
8
9
#Initiate the replica set
rs.initiate()
#display the replica set configuration object
rs.conf()
#Add the remaining members to the replica set
rs.add("node1:27018")
rs.add("node2:27018")
#Check the status of the replica set
rs.status()

Mongo打印如下的JSON表示副本集配置成功 (注意所有的节点都要health:1)

1
2
3
4
5
6
7
8
9
10
11
12
13
14
15
16
17
18
19
20
21
22
23
24
25
26
27
28
29
30
31
32
33
34
35
36
37
38
39
40
41
42
43
44
45
46
47
48
49
50
51
52
53
54
55
56
57
58
59
60
61
62
63
64
{
"set" : "ops_manager",
"date" : ISODate("2017-06-27T07:37:35.839Z"),
"myState" : 2,
"term" : NumberLong(4),
"syncingTo" : "node1:27018",
"heartbeatIntervalMillis" : NumberLong(2000),
"members" : [
{
"_id" : 0,
"name" : "master:27018",
"health" : 1,
"state" : 2,
"stateStr" : "SECONDARY",
"uptime" : 771,
"optime" : {
"ts" : Timestamp(1498549030, 2),
"t" : NumberLong(4)
},
"optimeDate" : ISODate("2017-06-27T07:37:10Z"),
"syncingTo" : "node1:27018",
"configVersion" : 3,
"self" : true
},
{
"_id" : 1,
"name" : "node1:27018",
"health" : 1,
"state" : 1,
"stateStr" : "PRIMARY",
"uptime" : 625,
"optime" : {
"ts" : Timestamp(1498549030, 2),
"t" : NumberLong(4)
},
"optimeDate" : ISODate("2017-06-27T07:37:10Z"),
"lastHeartbeat" : ISODate("2017-06-27T07:37:34.995Z"),
"lastHeartbeatRecv" : ISODate("2017-06-27T07:37:35.647Z"),
"pingMs" : NumberLong(0),
"electionTime" : Timestamp(1498548441, 1),
"electionDate" : ISODate("2017-06-27T07:27:21Z"),
"configVersion" : 3
},
{
"_id" : 2,
"name" : "node2:27018",
"health" : 1,
"state" : 2,
"stateStr" : "SECONDARY",
"uptime" : 595,
"optime" : {
"ts" : Timestamp(1498549030, 2),
"t" : NumberLong(4)
},
"optimeDate" : ISODate("2017-06-27T07:37:10Z"),
"lastHeartbeat" : ISODate("2017-06-27T07:37:34.994Z"),
"lastHeartbeatRecv" : ISODate("2017-06-27T07:37:35.780Z"),
"pingMs" : NumberLong(0),
"syncingTo" : "node1:27018",
"configVersion" : 3
}
],
"ok" : 1
}

4. 安装OPS Manager[ONE]

Notice

  • 最好是root安装,否则各种权限问题
  • 建议用tgz包, 更容易管理
  • 下载OPS Manager

修改OPS Manager 配置文件

1
vi /root/mongodb-mms-3.4.5.424-1.x86_64/conf/conf-mms.properties

修改 mongo.mongoUri

1
mongo.mongoUri=mongodb://master:27018,node1:27018,node2:27018

启动 MMS

1
2
3
4
5
6
7
8
9
10
11
12
13
./root/mongodb-mms-3.4.5.424-1.x86_64/bin/mongodb-mms start

Starting pre-flight checks
Successfully finished pre-flight checks

Migrate Ops Manager data
Running migrations...[ OK ]
Start Ops Manager server
Instance 0 starting...................[ OK ]
Starting pre-flight checks
Successfully finished pre-flight checks

Start Backup Daemon...[ OK ]

MMS 网页: http://yourip:8080

需要先注册一个Admin用户

配置MongoDB集群

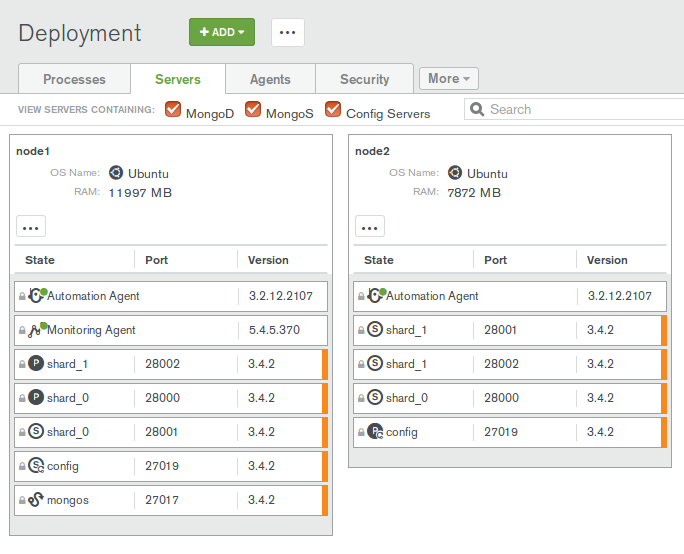
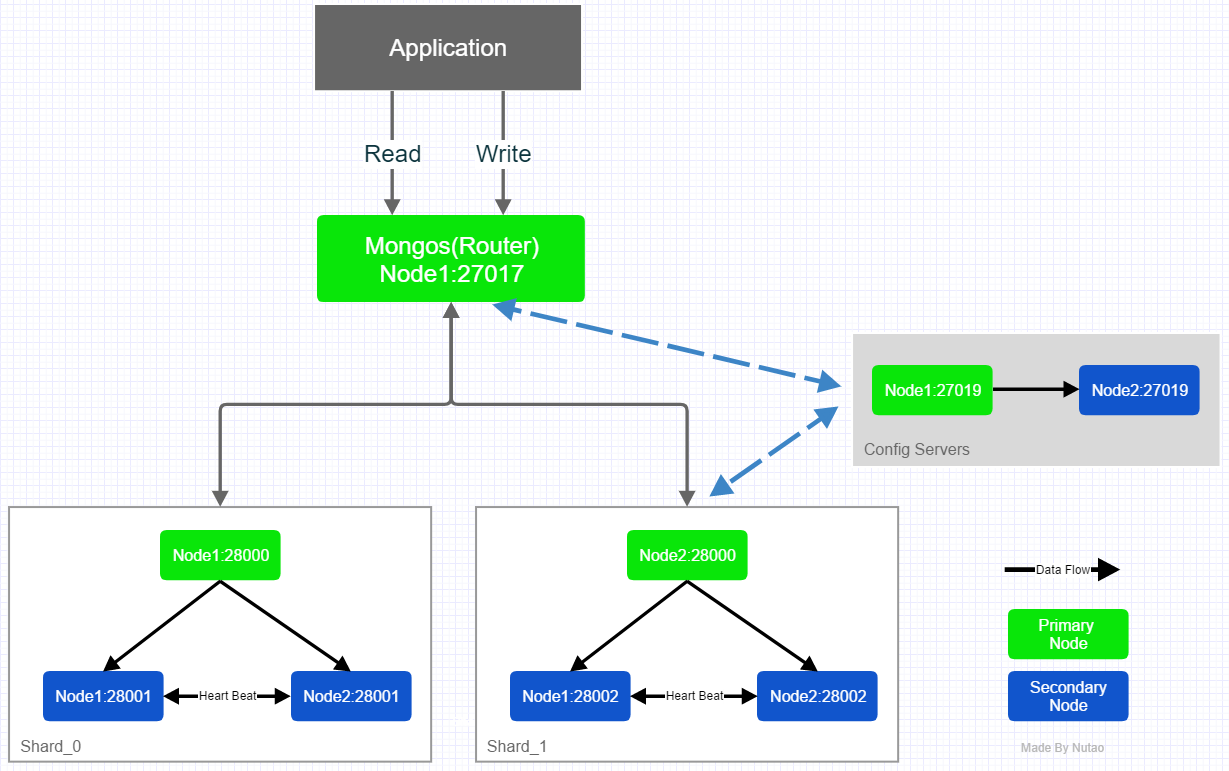
Cluster架构设计
Alt text

下载相关版本的 MongoDB

为了加快集群的部署, 可以预先下载好所需的MongoDB安装包,并将其放置到目录
/var/lib/mongodb-mms-automation/mongodb-linux-x86_64-x.x.x
例如:

1
2
3
4
# 解压
tar -zxvf mongodb-linux-x86_64-ubuntu1604-3.4.2.tgz -C /var/lib/mongodb-mms-automation/mongodb-linux-x86_64-3.4.2
# 设置权限(最好是先 ls -l 查一下用户权限)
sudo chown -R mongodb: /var/lib/mongodb-mms-automation/mongodb-linux-x86_64-3.4.2/

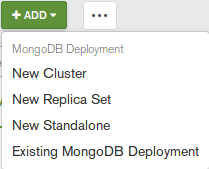
新建Cluster

Alt text

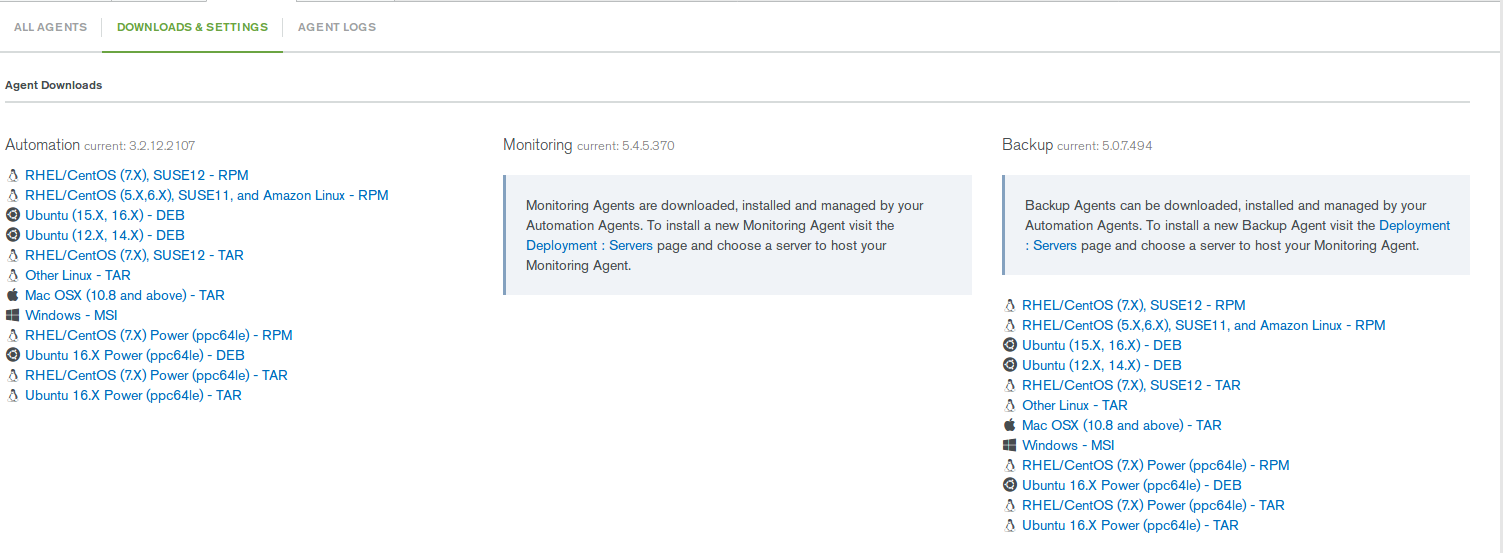
安装Ops Manager Agent (每一个子节点都要安装)

Alt text|center|

选择一个适当的版本下载, 然后根据教程修改相关的参数

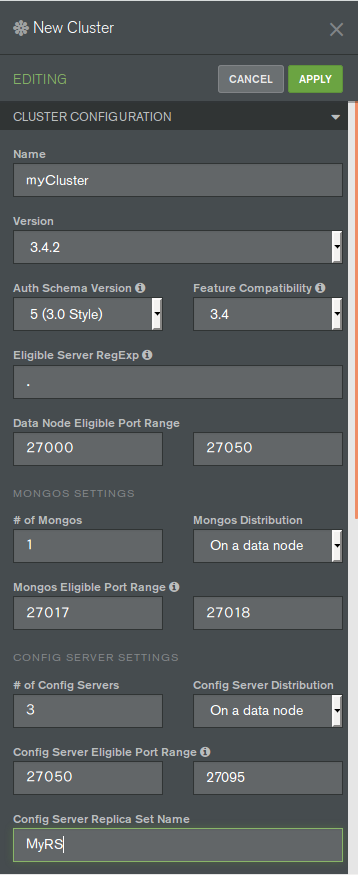
配置Cluster
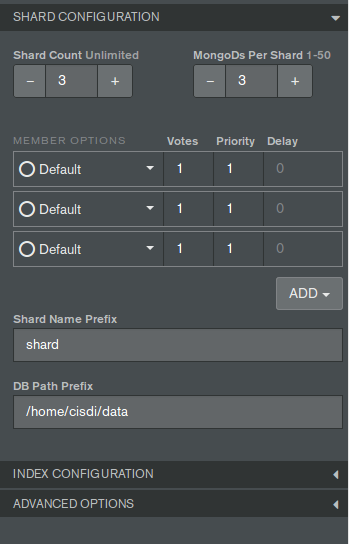
Alt text
Alt text

注意

  • 选择的Version版本是自己放到 /var/lib/mongodb-mms-automation 的版本

配置完后点击apply,等待所有部署完成
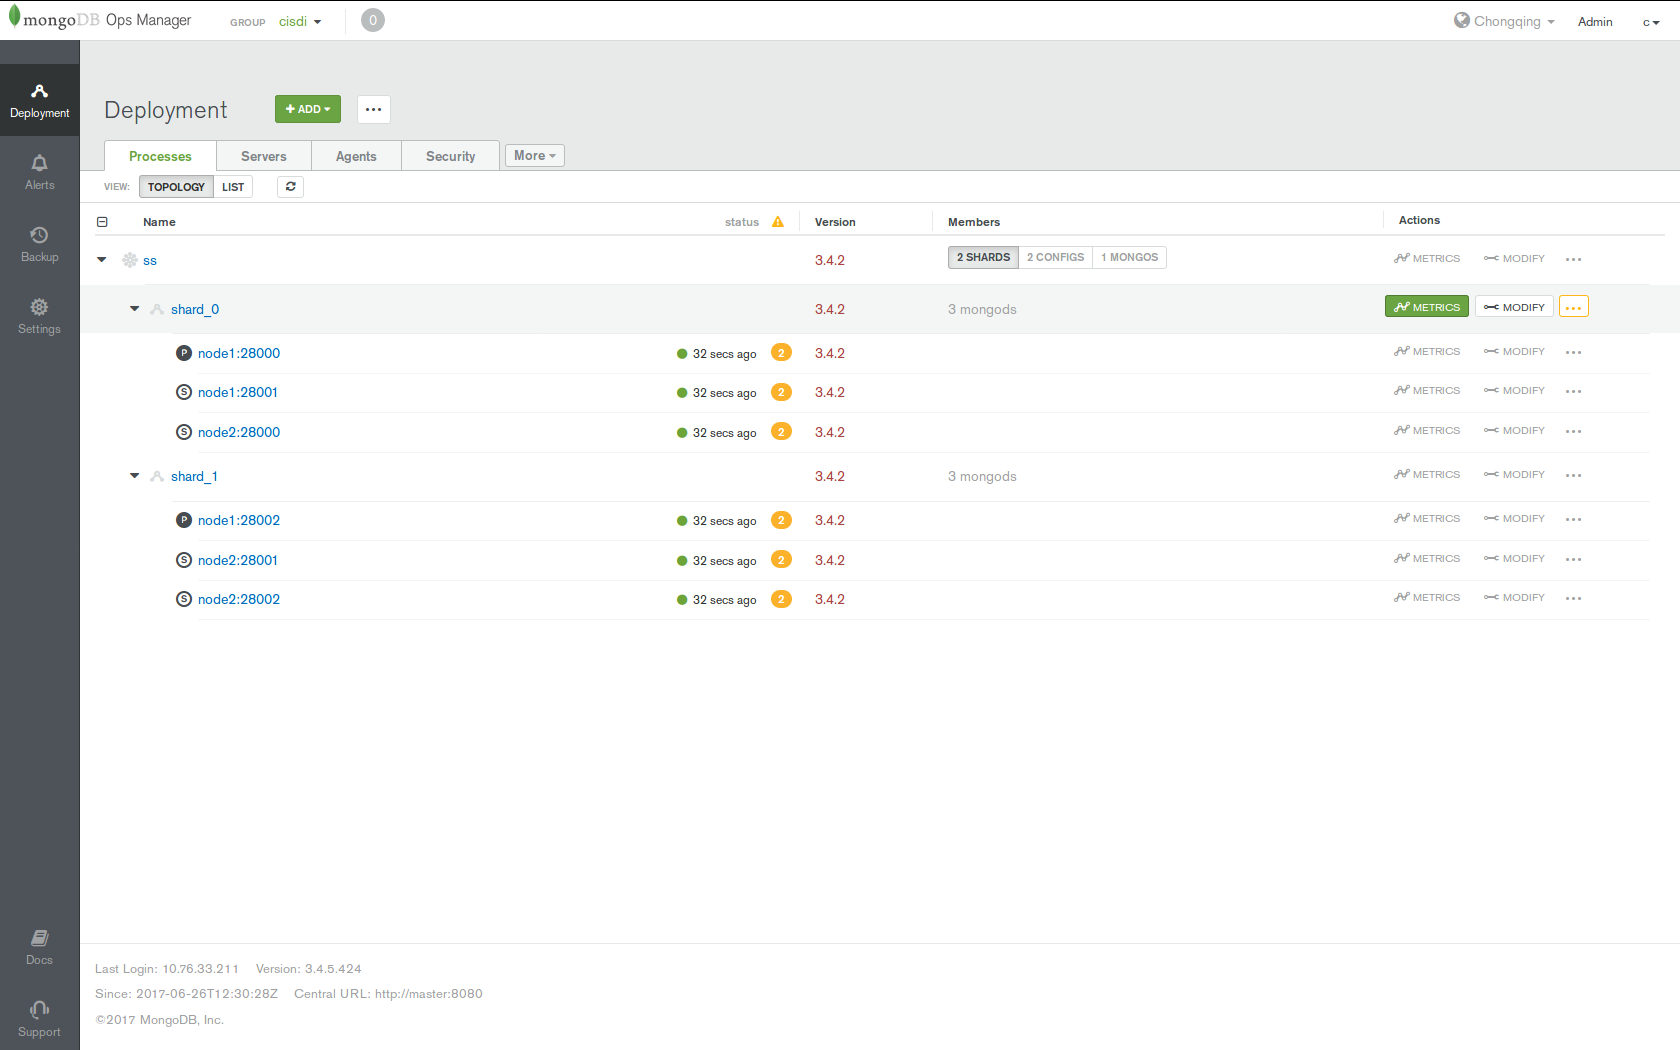
Alt text|left|
Alt text|right|

5. 通过Mongos连接到集群

检查Mongos部署的位置和端口

Alt text

连接命令

1
mongo --host node1 --port 27017
1
2
3
4
5
6
7
8
9
10
11
12
13
14
15
16
17
18
19
20
MongoDB shell version: 3.2.14
connecting to: node1:27017/test
Welcome to the MongoDB shell.
# 获取集群分片信息
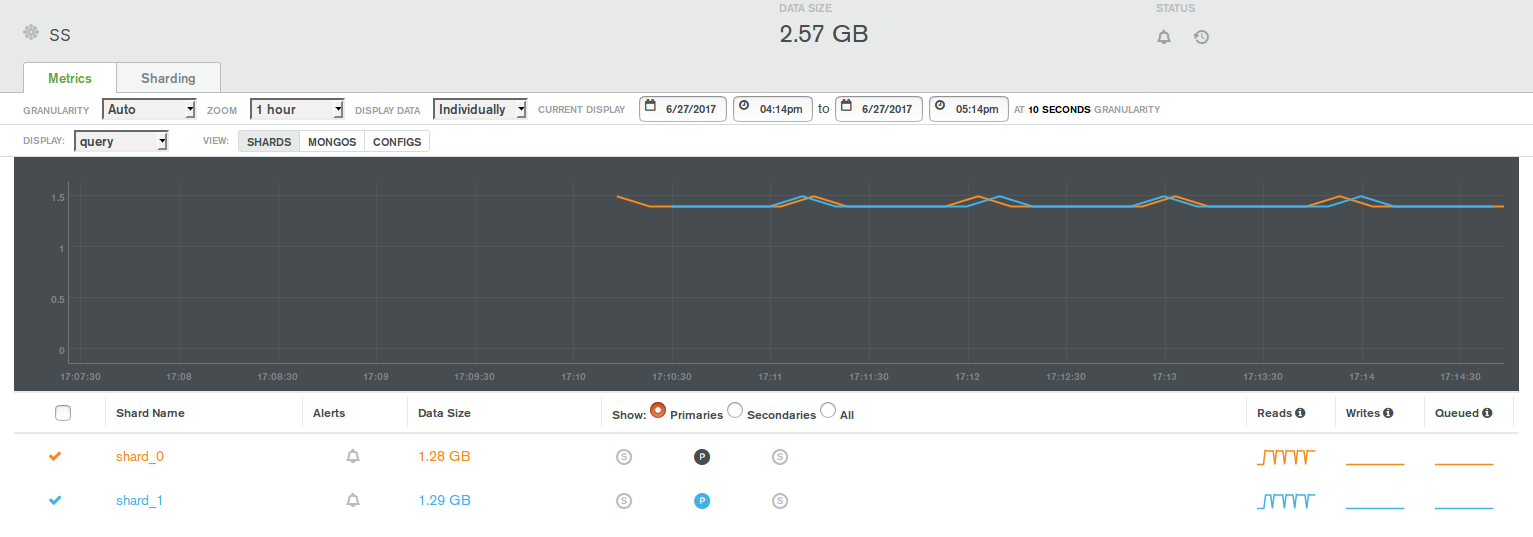
mongos> db.getCollection('test').getShardDistribution()

Shard shard_0 at shard_0/node1:28000,node1:28001,node2:28000
data : 1.28GiB docs : 370161 chunks : 34
estimated data per chunk : 38.59MiB
estimated docs per chunk : 10887

Shard shard_1 at shard_1/node1:28002,node2:28001,node2:28002
data : 1.29GiB docs : 372693 chunks : 34
estimated data per chunk : 38.85MiB
estimated docs per chunk : 10961

Totals
data : 2.57GiB docs : 742854 chunks : 68
Shard shard_0 contains 49.83% data, 49.82% docs in cluster, avg obj size on shard : 3KiB
Shard shard_1 contains 50.16% data, 50.17% docs in cluster, avg obj size on shard : 3KiB

6. 可能遇到的Bug

Q1. MMS无法启动或者在MMS执行操作时,总是提示Another Session has published the deploy

可能原因:

  • 管理MMS数据的 MongoDB ReplicatSet Primary Node挂了,而两个Secondary Node在选举的时候出现“间歇性切换”(由于Primary的数据没有Sync到所有的Secondary Node导致的从节点的数据不一致)。从而使导致MMS的Log和启动数据无法加载。

解决方法:
由于启动挂掉的Mongod节点需要做长时间的Rollback, 如果没有办法成功Rollback,直接舍弃掉挂掉的Node的数据(全部删除), 然后将其设置为Arbiter Node(仲裁节点,不参与数据存储,仅仅做选举投票使用)。

调整后的MongoDB ReplicateSet结构如下
Alt text

1
2
3
4
5
6
7
8
9
10
11
12
13
14
15
16
17
18
19
20
21
22
23
24
25
26
27
28
29
30
31
32
33
34
35
36
37
38
39
40
41
42
43
44
45
46
47
48
49
50
51
52
53
54
55
56
57
58
59
> rs.status()
{
"set" : "ops_manager",
"date" : ISODate("2017-06-29T13:10:51.081Z"),
"myState" : 1,
"term" : NumberLong(3110),
"heartbeatIntervalMillis" : NumberLong(2000),
"members" : [
{
"_id" : 0,
"name" : "master:27018",
"health" : 1.0,
"state" : 1,
"stateStr" : "PRIMARY",
"uptime" : 87435,
"optime" : {
"ts" : Timestamp(6437047226601570, 4),
"t" : NumberLong(3110)
},
"optimeDate" : ISODate("2017-06-29T13:10:49.000Z"),
"electionTime" : Timestamp(6436975792705503, 1),
"electionDate" : ISODate("2017-06-29T08:33:37.000Z"),
"configVersion" : 5,
"self" : true
},
{
"_id" : 2,
"name" : "node2:27018",
"health" : 1.0,
"state" : 2,
"stateStr" : "SECONDARY",
"uptime" : 16637,
"optime" : {
"ts" : Timestamp(6437047226601570, 4),
"t" : NumberLong(3110)
},
"optimeDate" : ISODate("2017-06-29T13:10:49.000Z"),
"lastHeartbeat" : ISODate("2017-06-29T13:10:50.968Z"),
"lastHeartbeatRecv" : ISODate("2017-06-29T13:10:49.752Z"),
"pingMs" : NumberLong(0),
"syncingTo" : "master:27018",
"configVersion" : 5
},
{
"_id" : 3,
"name" : "node1:27018",
"health" : 1.0,
"state" : 7,
"stateStr" : "ARBITER",
"uptime" : 16233,
"lastHeartbeat" : ISODate("2017-06-29T13:10:50.305Z"),
"lastHeartbeatRecv" : ISODate("2017-06-29T13:10:50.843Z"),
"pingMs" : NumberLong(0),
"syncingTo" : "node2:27018",
"configVersion" : 5
}
],
"ok" : 1.0
}

7. 参考文献

参考文档

https://docs.opsmanager.mongodb.com/current/core/installation-checklist/
https://docs.opsmanager.mongodb.com/current/core/requirements/#onprem-system-requirements
https://docs.mongodb.com/manual/administration/production-notes/

参考博客

http://www.cnblogs.com/wsl222000/p/6742504.html